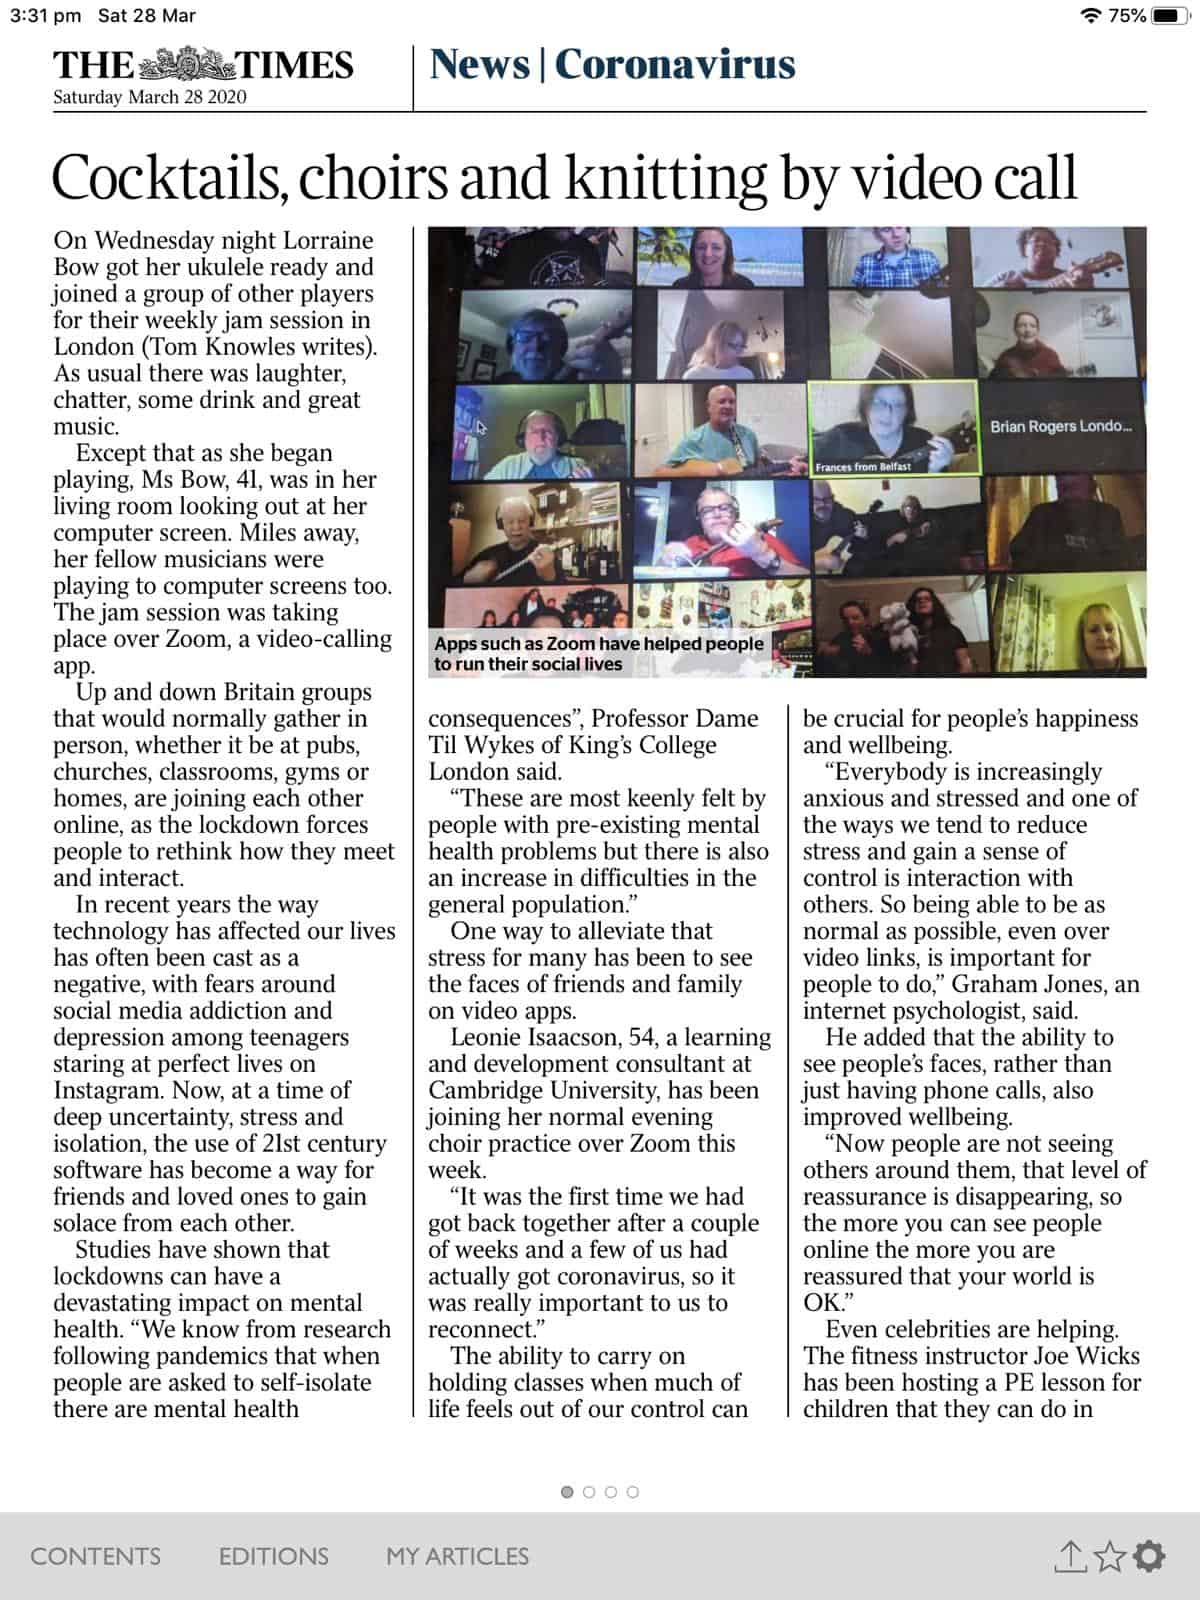
How I Got my Yoga Classes Live Online with Zoom
With the outbreak of Covid-19, Yoga teachers are learning fast how to get our classes live online. Amid the anxiety and the very real threat of this disease, there has never felt like a more important time to connect with our Yoga communities and to share our calm- and health-promoting practices. And, with many people having more time on their hands than usual, it’s a great moment to support them in taking this opportunity for stepping up their self-care.
And, yes, we are also naturally keen to find a way to keep doing what we do and to continue to make a living in this time of social distancing and lockdown.
Most Yoga teachers have never taught online before. They might have scoffed at the idea of teaching their embodied and energy-focused practice virtually. I certainly did that for a long time.
Then there are the many Yoga teachers who have long wanted to get online, appreciating the power of the internet to help them change more lives with their teaching. But they have found themselves paralysed by fear of the camera and confusion about the equipment and technology required.
There’s no time for paralysis now! And, over the past few weeks, there has been an explosion of webinars and articles on the internet guiding teachers on the ins and outs of getting their Yoga classes live online quickly.
But I know from talking with Yoga teachers in Cambridge that some are still finding it a challenge.
My own experience of getting my Yoga classes live online
I’m no expert in remote teaching and I am learning from constant mistakes. But my live virtual classes are up and running, I have a functioning system in place and my Yoga students seem to be appreciating my offering and the opportunity for regular connection while stuck in their homes.
So I hope that talking through my own real-life experience might be helpful to anyone struggling to get started online now or in the future. I’m not going to try to list numerous options, but just to narrate how I quickly moved my regular Cambridge Yoga classes live online.
I’m fortunate that I already have had some relevant experience over the past two years from developing my pre-recorded Yoga for Cyclical Well-being online program for women’s health, well-being and empowerment. But, before three weeks ago, I had never taught my Yoga classes live online.
So the challenges for me were to work out:
- How to take bookings and payment for online Yoga classes
- Whether to teach my classes live or recorded
- How long to make my classes and how much to charge
- What equipment to use to film my classes
- What technology to use to connect with my students
- How to adapt my teaching for Yoga classes live online
- Other miscellaneous little things …
In all the above, a key consideration was to make the best use of what I already have in order to keep my costs down and to get up and running fast. It’s very possible that I will decide to keep an online offering available when Coronavirus passes, but I’ll work on upgrading and streamlining things later.
How to take bookings and payment for online Yoga classes
I initially hoped to use Teachable as a one-stop-shop for taking bookings and for letting students access my online Yoga sessions. Teachable is one of the biggest platforms for setting yourself up to teach anything online. And I already have a subscription, as it hosts my online program, for which I find it simple, effective and reliable.
However:
- I am (at least for now) staying with the same class-credit system for students that I use for my face-to-face Yoga classes and this will not work with Teachable, which is set up for taking monthly/annual subscriptions or one-off payments for courses.
- On their Basic plan (US$29/month), Teachable charges a 5% transaction fee for payments received (on top of the standard fee charged by payment processors like PayPal or Stripe). For my online program, I avoid this by taking payment outside Teachable. I then register students manually to my program – but this would be too unwieldy and time-consuming for individual classes.
Another excellent one-stop-shop option for Yoga classes is Namastream. I considered them a few years ago for my program, but baulked at the $125/month price tag! Whether you use them or not, I highly recommend taking a look at their free support documents on setting up online classes.
So, with neither of these fitting the bill, I decided to knit things together myself to create a smooth booking process for signing up for my online Yoga classes (and Qigong classes).
For years, I have used a client management software, GetTimely (I’ll say more about this soon), to issue students with packages of class credits and to record attendance. So I fiddled around with GetTimely’s online booking function (which I’ve never needed before) to make it work for me.
Then I created a new page on my website – Online Classes: Yoga and Qigong – and linked its booking buttons through to GetTimely. This seems to be working well.
I’d really love to recommend GetTimely and this simple solution to you. But, unfortunately, I cannot as they no longer offer their class-booking functions to new clients (as they are focusing instead on salon bookings).
But here are some other ideas for setting up automated online class booking:
- Your website software might have some functionality that will let you set up a simple online booking and payment form, which you could link with PayPal or Stripe. (If you need help creating or updating your website, Chris McMahon at Very Simple Sites is really friendly, efficient and charges reasonable prices).
- For something more complete, you could take a look at Classfit (I’ve heard good things about it and it is free) or other paid scheduling software like Calendly or Acuity. You may or may not then need to link this to a page on your website.
Or, of course, you can simply take bookings through email and bank transfers.
Whether to teach my Yoga classes live or recorded

This was not a difficult decision for me. I already have my pre-recorded offering in the form of my online program. In its pre-recorded Yoga classes, I can’t communicate directly with my students, but the program’s live weekly video support call gives us a chance to chat about anything that has come up for them. I’ve been planning to add some live Yoga classes to this for some time – and the Covid-19 lockdown has forced me to stop procrastinating!
Before starting to teach full-length live classes, I had a go at offering shorter practices using Facebook Live to my private Facebook Group, Women’s Cycles, Women’s Power. This is a closed group, meaning members have all been approved by me, and it’s a friendly community, so, to me at least, it felt like a very safe space to get used to going live.
And I managed to have a practice run at going live on Facebook without anyone seeing me. To do that, just go to your personal profile page and click Live Video above the posting box. Then change the privacy settings from Public to Only Me. When you go live and when the video is posted on your News Feed, only you will see it (and then you can delete it).
I know that some Yoga teachers have decided to go with recorded online classes as that suits them better right now. Recording can certainly be a good starting point for getting used to being in front of the camera and ironing out any issues with your set up (and can, of course, be an amazing business model – just look at Adriene!). But, I’ve found that people are particularly forgiving right now of technical glitches and incredibly appreciative that we are making the effort to connect with them in real-time in their homes. So, if live classes is what you’d really like to do, now is the ideal time to give it a go.
Of course, there might be other reasons for wanting to pre-record your Yoga classes. Perhaps it just feels right for you, perhaps your internet bandwidth would not support live streaming or perhaps the equipment you have to hand is great for recorded classes (eg a good camera or camcorder) but no good for going live (eg a really rubbish old phone and computer).
But live online Yoga classes* do give us the best opportunity to offer something as close as possible to the face-to-face sessions that our students are used to. Not only can they see us, but – so long as we don’t pack too many into each class and we use the right software and a big enough screen – we can see each of them and offer them group or individual cues and feedback.
(* By this, I mean a Yoga class using a platform like Zoom, rather than Live Streaming on YouTube or Facebook where you can’t see your students).
Right now during Coronavirus lockdown, I personally think that the best possible offering we can give our students is to make both live and recorded sessions available (if our insurance covers it – more later). This is what I am doing – teaching live and recording the session. Anyone who registers receives a limited-time recording, whether or not they also turn up live to the Yoga class.
Why do I think this is a good idea? Because Yoga classes live online allow for the connection, familiarity and support that many people are craving amid the isolation of lockdown. But, with the whole family at home, it might be impossible for some students who previously left their house to come to my in-person class to find the necessary space or peace to practise at that time. The recorded option gives them the chance to maintain their practice by doing it when things are quieter.
How long to make my classes and how much to charge
Another question was how long to make my classes. There are lots of articles etc on the internet insisting that online Yoga classes must be short (no longer than 20 minutes), because people have too many distractions at home to stay focused for 60 or 90 minutes.
This might well be true – in normal times. But these are not normal times!
My experience in the past few weeks has been that it’s more than fine to maintain normal class lengths right now.
This is partly because many people are at home and have more time on their hands than usual. But, for regular students at least, I think it’s also because their Yoga class is a moment of stability in a world turned upside down. So they are keen to continue ‘attending’ (all be it virtually) something that resembles as closely as possible their regular weekly class and to connect in a relaxed way with familiar friendly faces beyond their homes.
We really need that sense of community at the moment. So I ‘open the doors’ of my class 15 minutes before the session starts and am happy to hang around afterwards too. This gives us time for a chat, just as would happen in a normal class.
All that said, I believe there is most definitely also a need for shorter practices that people can fit in around daily life. I’m continuing to regularly post free short practices on Facebook and intend to get around to adding a couple of shorter classes to my schedule.
A related issue is how much to charge for classes and how to structure payments. As I’ve mentioned above, I’ve chosen to maintain my normal class prices and pricing structure – with which students can pay drop-in or, more usually, buy blocks of credits to redeem against the classes they attend.
I’m comfortable with maintaining the same price, knowing what goes into offering Yoga classes live online and giving students extra value with the class recording that allows them do that practice multiple times through the week.
If I do continue offering online classes (in addition to my in-person classes) in the longer term, it’s very possible that I’ll set them up on a monthly subscription. But that’s for later …
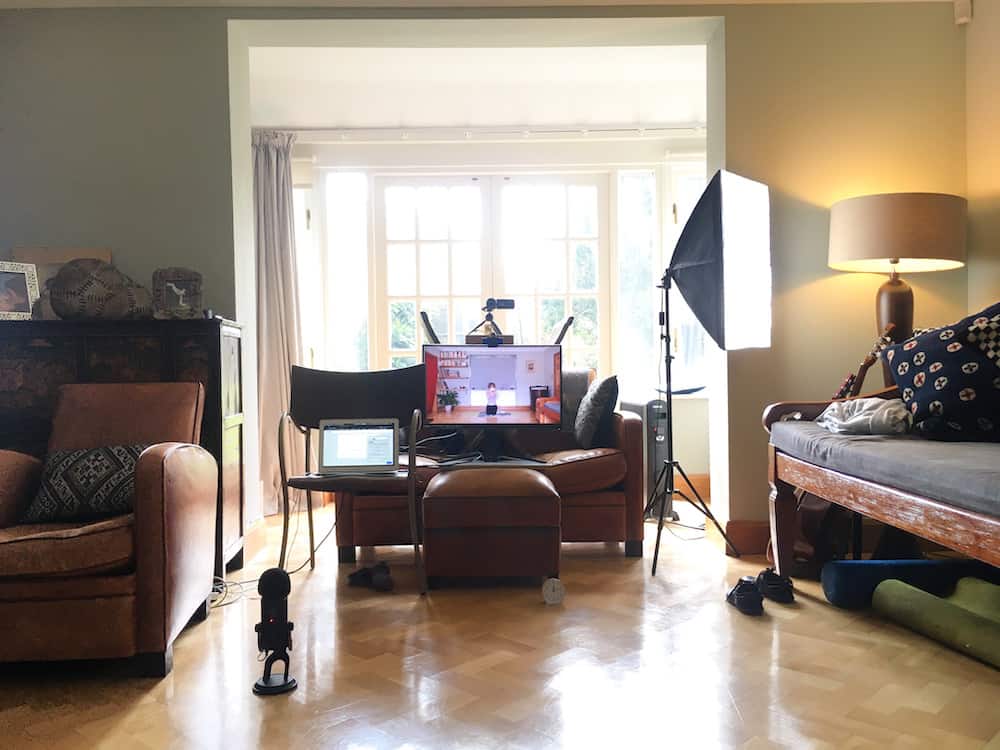
What equipment to use for filming my classes
I should state upfront that many of my choices here go against the prevailing online advice to just make do and not worry too much about the quality of your image or sound. I do agree that what students most want is to continue studying with their teacher and will be very forgiving of technical issues and that it makes sense to get started spending the least money possible on new equipment.
However, I personally hate watching a poor quality video or listening to crackly audio. And, anyway, I just can’t resist constantly tweaking to try to upgrade and improve my offering – both in terms of my teaching and its virtual delivery.
(By the way, to help perfectionist me try to get things right two years ago, when I started pre-recording videos for my online program, I turned to Cambridge TV Training, who offer an excellent selection of training courses and workshops in making and editing videos and who were also willing to offer me reasonably priced 1-2-1 sessions.)
By the time Coronavirus hit, I already had all the equipment I needed for my pre-recorded sessions, but I knew that I’d need to tweak my set-up for live classes. Below is what I already had.
- Recorded classes equipment
- Video –
- iPhone – I initially started using my iPhone (not a fancy new one, but the old SE), but quickly got fed up with the small visual field when recording (I’m tall and, in the medium-sized room I record in, my hands were always going out of the image when I stretched up) and the limited control over exposure etc. I know that lots of people are really happy recording using their phone, but it just did not work for me.
- DSLR Camera – I switched to using my son’s Canon EOS 700D DSLR camera, which resolved the issues of visual field and exposure and gave me a good quality image. However, I have been constantly frustrated by limited battery life and the camera’s automatic suspension of video recording after 30 minutes (so I need to stop, hit record again and then merge the recordings when editing). I don’t know if this is common to most mid-range DSLRs but, on this camera, it cannot be overridden and has caught me out numerous times.
- Canon Legria HF r806 camcorder – I’ve recently invested in this camcorder (which is the UK equivalent of the Canon Vixia HF r800 recommended by Namastream) for recording Yoga classes. This is helping me overcome the frustrations of using my DSLR, while getting a good quality recording.
- Audio
- Rode SmartLav+ and iPhone – I found that this little lavelier mic delivered great quality audio when clipped onto my shirt and connected to my iPhone (attached to my Yoga trousers with a belt clip) to record using the Voice Memo app. I then used editing software (see below) to sync this audio to the video. While the quality was good, I got really bored of both the microphone and the phone strapped to my back getting in my way when practising.
- Blue Yeti Microphone – this is the most popular microphone with vloggers etc. I bought it to get good quality audio when recording theory lessons of my online program straight to my computer (so no post-production syncing needed). I’d read that it would be no good for online Yoga classes as it would be too far away from me and the audio would be distorted by my moving around. But, getting fed up with the lavelier mic, I decided to give it a go. And it worked really well. So now this is what I used, just placed on the floor in front of me while I teach.
- Lighting
- Natural light – I’ve got big windows in my room and agree with the experts that it is definitely good to make the best use possible of natural light. Although that does mean that the light quality and level is always changing, so I need to adapt my set up and camera settings accordingly. Also, I have a big window directly behind where I need to stand. So I bought a large piece of blackout fabric to cover it (hidden behind a thin blind).
- Studio lights – I don’t think I could have managed without these to get the right amount of light and to have control over the direction of the lighting and the shadows. I bought some relatively cheap ones from Amazon.
- Video –
I’m continuing to make use of much of this equipment for my live classes. With some changes.
- Live Classes equipment
- Video
- Laptop – I am using my laptop to access Zoom (see below) and film my live classes. I started with my built-in computer camera, which was fine but I decided again that I needed a bigger visual field and wanted more control over exposure etc, so I have bought a webcam …
- Logitech C920s webcam – this is attached to my computer and is working well, although its default settings definitely need tweaking. This would be easy through Logitech’s webcam software if I had a Windows laptop, but unfortunately this does not work with a Mac. So I have to make do with an app (Webcam Settings) with much more limited functionality (but better than Logitech’s own basic Camera Settings app).
- Canon Legria HF r806 camcorder – I am using this to record my live sessions and make the recording available to all who register for a class (including those who could not join live). I did try simply using Zoom’s recording function, but have struggled with resolution for longer recordings sometimes dropping to an unacceptable 360p, creating a poor quality recording. Zoom offers no solution.
- A bigger screen – I’ve at last found a use for my teenage son’s big gaming screen! I attach it to my laptop so I can see the images of everyone attending the class much more clearly. This really makes a great difference in feeling more connected to students and having a better chance to offer them feedback on their practice.
- Audio
- Blue Yeti – I’m continuing to use this great microphone as I do in recorded videos.
- Rode Wireless Go – I’m not using this, but have seen this newish wireless microphone system highly recommended by Namastream and others. The audio is delivered wirelessly to a receiver and directly into your video recording device (eg computer).
- Lighting – as for recorded sessions.
- Video
What technology to use to connect with my students
This was not much of a dilemma, as I have been hosting weekly support calls for a couple of years on my online program, so, for me, there was only one place to go.
- Zoom Video Conferencing – I’m amazed that Zoom is still functioning given that everyone seems to have turned to it since social distancing became a thing with Coronavirus. I’ve already got a paid account, which means there are no time limits on calls, so I knew I could use it to get my Yoga classes live online. That said, I had not actually taught a Yoga class through Zoom till recently. I have now and I love it. All my classes are set up on Zoom as recurring meetings, making them very easy to manage. If anyone is not yet up and running on Zoom, here’s a little video I made to walk my students through the process of joining a class.
- Facebook – I am still continuing to use Facebook Live and to post pre-recorded video to my Facebook closed group and NurtureWorks page to share free short Yoga practices. Zoom sessions can also be broadcast live on Facebook. And it is also possible to use Facebook Live to host paid classes, but I have not looked into this. Fyi – unlike in Zoom, you cannot see an image of those watching you on Facebook Live and can only communicate with them through the comments.
How to adapt my teaching for Yoga classes live online
In the end, this is what really matters. The rest of this is just a way to deliver our Yoga teaching remotely to our students in the most effective way.
When I started recording my online program, I thought I would find it really hard to stand in front of a camera and teach to it. So I was pleasantly surprised to find it was actually quite easy and that I enjoy it. I’ve been able to take everything I’ve learned creating that program into my live Yoga classes. But there are also differences when teaching live and I’m learning more each time I hold a class.
Here are some of the things I’ve learned and am learning:
- When teaching a pre-recorded Yoga class, I have always simply kept in mind that I am talking to my regular students. And with live online classes, that’s much easier, as I can actually see them on the screen. I’m used to this now, but, before my first recording, I did plenty of practise so I could feel more relaxed. A key thing that I can still sometimes forget is to look at the camera, not at the screen, when I want to address the class, else students feel that I am not looking at them. Another is to fill the space with my voice, as I would when teaching normally.
- I’ve never tried to make my recordings or my live online Yoga classes look like perfect, slick productions. That’s not me and I want to be the same person online as I am teaching my regular classes. Online as in-person, I still make mistakes and things still go wrong – and I’ve discovered that there’s a whole load more scope for that teaching live online from home when the whole family is in the house! That’s the way it is, so I’m just letting that be.
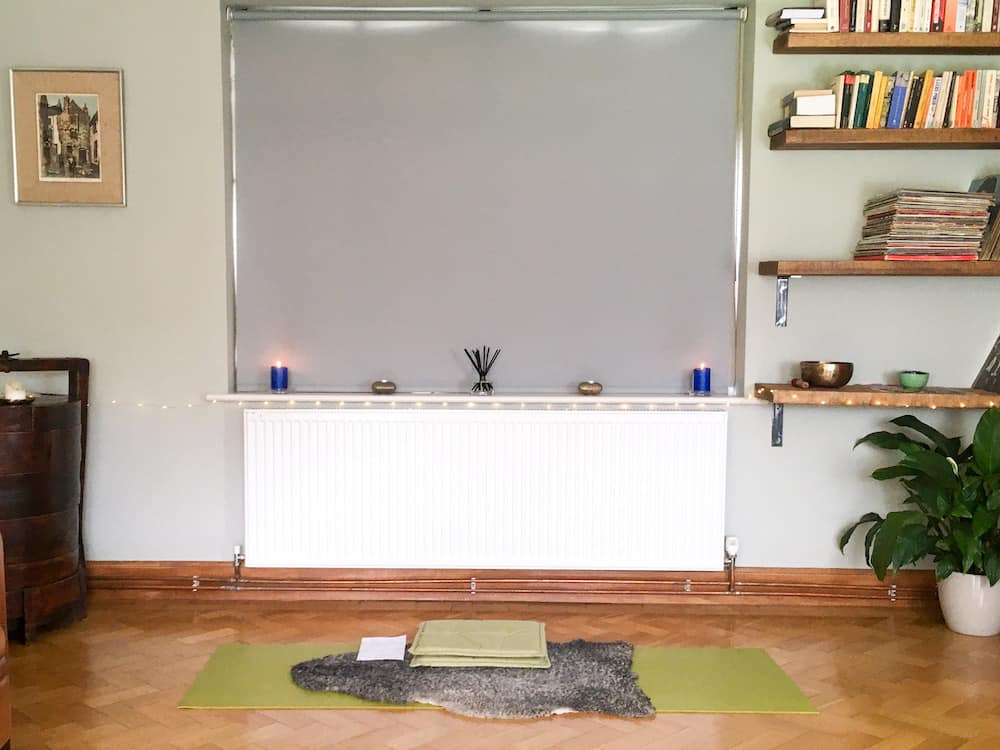
- That said, I do politely ask my family to be as quiet as possible and not to hog the bandwidth while I teach. And I take care to set my room and my equipment up well in advance. I check that my mat is placed in a way that keeps my long limbs in the picture throughout the class. And I check that my lighting is good and that my audio and video equipment is all is working as it should. To leave all this to the last minute is a recipe for stress – not a good way to start teaching a Yoga class, unless I want to ramp up nervous anxiety in my community, instead of helping to calm it!
- I try to set up the room in a way that feels calming and suited to practising Yoga. But I’m teaching from my home living room and I’m not trying to hide that. A plant and some candles go a long way.
- I make sure to open the class 15 minutes before I start teaching. This is partly to make time for chatting, as I mentioned above. But it’s also to have a chance to show everyone key controls within Zoom, assist them with any technical difficulties and help them arrange themselves and their mats as well as possible so I can see them. I recommend that they:
- Use the biggest screen possible so they can see me clearly.
- Try not to stand in front of a window and/or that they put a light in front of them (else they are darkly silhouetted).
- Place their device 2-3 metres away to try to capture as much of themselves as possible on their screen and don’t face their screen towards the ceiling (which seems to be a favourite)!
- Make sure their device is plugged in or fully charged.
- Close off all other apps on their device to reduce potential distraction and maintain the best bandwidth.
- Ask their family to give them quiet time and space – while accepting that a child might just wander in (and enjoying their cats and dogs joining in!).
- I plan my live online Yoga classes conscious of the fact that:
- I want to share practices that will support students in maintaining a sense of stability and calm and help boost their vitality and immunity. This means tending towards gentle, relaxing practice (varying, as my classes do, with the turning of the Five Elements), while allowing them to stretch out and strengthen their physical bodies in a safe and non-draining way.
- They will have limited props.
- I cannot see them as well as I could if I was in the room with them nor offer the same level of feedback. So I keep things simple and up my usual focus on slow, mindful movement.
- My verbal instruction and demonstration need to be as clear as possible.
Other miscellaneous little things:
- How to make sure that only booked-in students can access my classes each week – I’ve resolved this by setting a password on Zoom for each recurring class. So the unchanging Zoom link for each class is posted on my online classes webpage. But I change the password each week and send it to registered students one hour before the class begins (I tell them they should register at least one hour ahead if they want to attend live).
- How to edit my recorded videos – I already use Apple’s Final Cut Pro software (which I learned at a Cambridge TV Training workshop), so am all set if editing is needed. Many Mac users use free iMovie.
- How to reduce the size of my big recorded video files – I was introduced to Handbrake some time ago. It was a little fiddly to navigate the first time, but is actually simple to use. It compresses video files, making the size much much smaller, but they remain good quality.
- How to share my recorded videos with students – I’ve opted to do this using Vimeo’s cheapest paid account (Plus). I thought about using my free Youtube account, but prefer the clean look and customisation options on Vimeo and the fact that it doesn’t offer people all kinds of other videos after watching mine.
- Whether my insurance covers me – I’m insured through Yoga Alliance Professionals. This covers me for live and recorded classes online. Other insurers are different and many have updated their policies in the past few weeks to respond to the Covid-19 situation. So be sure to check.
So that is how I’ve got my Yoga classes live online and what I’ve learned so far on this ongoing journey. I’m enjoying it enormously and am definitely a convert to this format.
I’m so grateful to the internet for enabling me to stay connected to and to share precious Yoga and Qigong practices with my students in these difficult times. And I’ve had appreciative feedback from them – including from some who were really sceptical about joining a virtual class.
That said, I’m looking forward to getting back to my in-person classes too, but know that this experience will bring something new to them.
I hope this rambling account of my experiences might be useful to any Yoga teachers (or any teachers of anything else) who are still hesitating to take their offering online.